
How to Mark Attendance Automatically Using Employee Checkins
Frappe HR allows organizations to automatically mark employee attendance based on Employee Checkin records. Once Employee Checkins and Shift Types are configured correctly, the system can generate attendance records automatically without requiring manual intervention.
To ensure auto attendance works correctly, you must configure Employee Checkins and Shift Types properly.
A. Create or Import Employee Checkins
Employee Checkins can be created manually or imported from biometric devices and attendance systems.

While creating Employee Checkins, keep the following points in mind:
- Set the check-in time carefully for both IN and OUT log types.
- For IN logs, the check-in time should be greater than Shift Start Time minus the “Begin check-in before shift time” value.
- For OUT logs, the check-out time should be less than Shift End Time plus the “Allow check-out after shift end time” value.
- Only valid check-ins that fall within the configured shift timing window will be mapped to the shift correctly.
IMPORTANT
If Employee Checkins fall outside the permitted shift timing range, the system may not associate them with the correct shift, which can prevent attendance from being marked automatically.
B. Verify Shift Type Configuration
The Shift Type configuration plays a critical role in the attendance automation process.
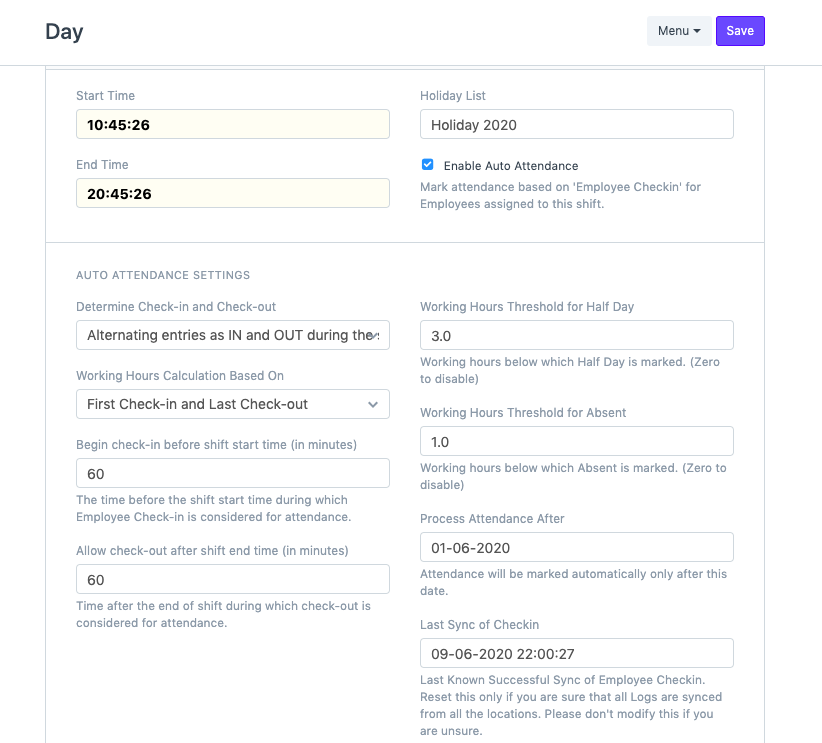
Ensure the following fields are configured correctly:
- Process Attendance After
Attendance will only be marked for dates after the selected value. Make sure this date is configured appropriately. - Last Sync of Checkins
This field specifies the timestamp up to which Employee Checkins should be processed.
If the Last Sync of Checkins value is earlier than the shift end time, the system assumes the shift is still in progress and will not process attendance for that day.
NOTE
Incorrect values in Process Attendance After or Last Sync of Checkins are among the most common reasons why auto attendance does not get generated.
C. Run Auto Attendance Manually
After creating Employee Checkins and verifying Shift Type settings, you can manually test attendance generation.
- Open the relevant Shift Type.
- Click Mark Auto Attendance.
- Verify whether attendance records are generated successfully.
This helps validate the configuration before relying on the automated scheduler.
Automatic Attendance Processing
Frappe HR includes a background scheduler that automatically processes attendance records.
The scheduler runs every hour and automatically marks attendance based on valid Employee Checkin records.
However, after importing or creating new check-ins, you should always verify:
- Process Attendance After
- Last Sync of Checkins
These two settings determine whether the system can process the newly added check-in records.
TIP
When troubleshooting auto attendance issues, first verify Employee Checkin timings, Shift Type timings, Process Attendance After, and Last Sync of Checkins. In most cases, correcting these settings resolves attendance processing problems.
Related Topics
- Employee Checkin
- Attendance
- Shift Type
- Auto Attendance
- Employee
- Biometric Integration
SUMMARY
Frappe HR can automatically mark employee attendance using Employee Checkin records. For successful attendance generation, valid IN and OUT check-ins must fall within the configured shift timing window, and Shift Type settings such as Process Attendance After and Last Sync of Checkins must be configured correctly. The system scheduler processes attendance automatically every hour, while the Mark Auto Attendance option can be used for manual verification.